


 Photo from unsplash
Originally Posted On: How to Set Up a VPN for Chrome [2021] | AlwaysVPN.com
Being the world’s favorite browser, Google Chrome handles over 5.6 billion searches every day, and about half of those searches end in a purchase, login, or site visit. That’s a ton of user data floating around on the open web – a playground for hackers and surveillance agencies.
If you want to browse the internet safely and anonymously, we recommend using a VPN for Chrome. A trustworthy VPN not only keeps your data safe from snooping eyes, but it can also stop your internet service provider (ISP) from throttling your connection speeds.
Better yet, it can provide a perfectly legal workaround for accessing international content and bypassing censorship. So, whether you want to watch Netflix UK in America or are traveling abroad, a VPN can help you stay connected almost anywhere.
You can download a VPN app directly onto your device, or as we specifically focus on in this newbie guide, you can take advantage of a provider’s VPN Chrome extension. The best part is it’s quite easy to install and use a VPN in a browser.
What is a VPN browser extensionFor the purpose of this setup guide, we cover how to use a VPN browser extension. However, if you want to protect all of your web traffic, including non-browser internet connections, it’s best to install a full VPN application onto your smartphone or computer. For device-specific VPNs, we offer recommendations for the most preferred platforms:
As you might have guessed by its name, a VPN browser extension is a lightweight version of a VPN service that encrypts all of your internet traffic going to and from your web browser. This effectively hides your IP address and anonymizes your browser-based activities. There are various VPN extensions for browsers like Chrome, Opera, Safari, and Firefox. Setup is similar for all, but today, we focus on Chrome specifically.
Using our step-by-step instructions below, you can install a VPN extension from the Chrome Web Store in less than five minutes.
What you need to get startedBefore we jump into things, here’s what you need to get started:
- Download the latest version of Google Chrome.
- Sign up for a Chrome-specific VPN subscription. (We recommend one of these.)
- Verify your email address to activate your VPN account.
Once you’ve selected a Chrome VPN, let’s get started. For this guide, we set up NordVPN as an example since it’s the best VPN for Chrome in our opinion.
Some providers require users to run their device app and Chrome extension simultaneously. This is true for NordVPN, so we’ll walk you through how to download the desktop version first. If this isn’t the case for you, skip to step #10 to see how to install the browser extension.
- Open the App Store or Google Play Store and search for the NordVPN app. For iOS, the app is called “NordVPN IKE – Unlimited VPN.” Click Get and/or Install to download the desktop application on your computer.
- Once the app is downloaded, a privacy alert may popup on your screen that asks for logging permissions. For NordVPN, you can see that your email address and device/OS version are required. However, you do have the option to share anonymized diagnostic data as well. We recommend leaving this unchecked.
Once you’ve read through the terms (and if you agree to them), click Agree to required to continue.

- Open your VPN app and get familiar with its interface. Note where your login button, server list, connection status, and settings are all located.

- Once ready, click on the “login” button to enter your account credentials. Until you log in to your VPN account, your device is still at risk. Notice how NordVPN flags my connection as “Unprotected” in the title bar.

- Enter your login credentials you received when you signed up for your VPN subscription and click Continue.
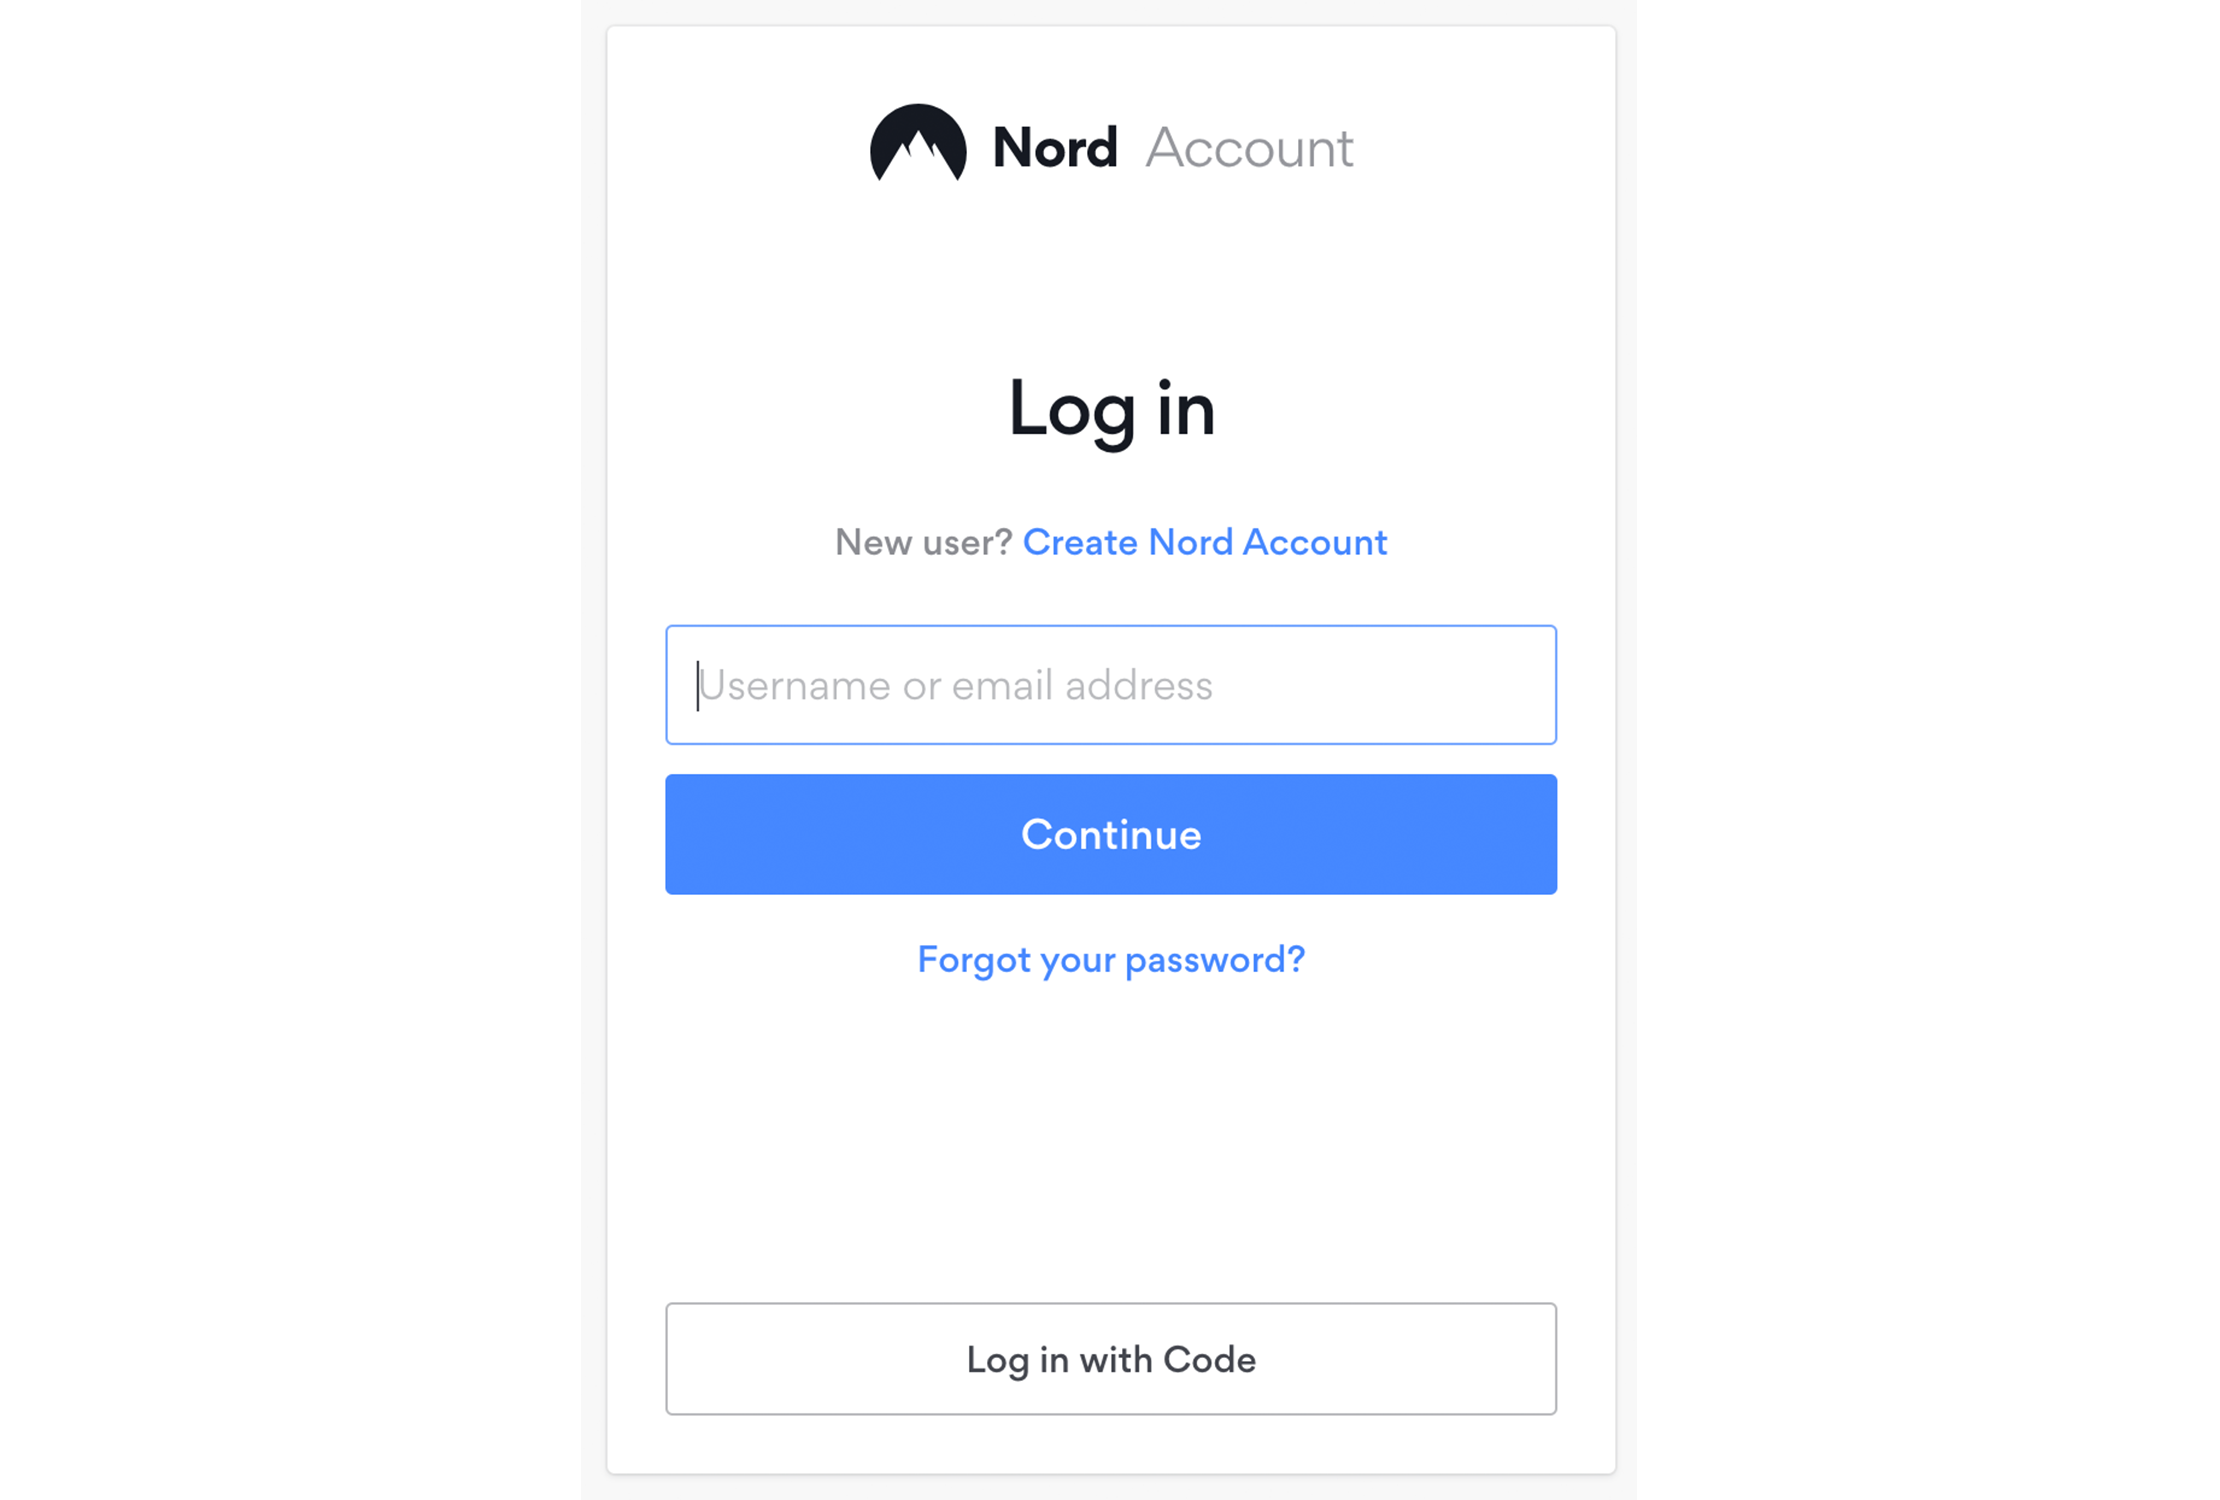
- In most cases, you’ll be notified once you’ve successfully logged in.

- Now it’s time to choose a VPN server and secure your connection. To do this, you can select a server from your VPN’s country list or let your VPN automatically choose the closest server near you if they offer that feature. NordVPN calls this a Quick Connect, and you can find it in the upper-right corner of the app window (where the Login/Sign-up buttons were before).

- When you try to connect a server, some devices will require additional permissions. Be sure to read through them in full before continuing to the next steps.
On MacOS, a series of NordVPN agreements will pop up for you to review. First, you’ll see an explanation of why NordVPN needs your Keychain password. Click Got it to continue.

Then, the actual Keychain request will appear for you to enter your Keychain password. If you prefer to save time, click Always Allow so you don’t have to re-enter your password every time you connect to a NordVPN server.

Lastly, a window requesting VPN Configurations will appear. This allows your NordVPN app – or any VPN for that matter – to filter all internet activity from your device (while connected to a server that is). Click Allow to complete all required agreements.

- I chose Quick Connect and let NordVPN find the closest VPN near me. Note that the closer you are to a server, the faster your connection speeds will be in most cases.
Here, you can see that NordVPN automatically selected a server in the United States where I am located (indicated by the green pin) and switched my online status to “Protected.” Now, my connection is fully anonymized.

Now that you have your VPN downloaded on your device, you can move on to installing the Chrome browser extension of it.
- Boot your Chrome browser, and open your VPN service provider’s website to find its Google Chrome browser extension for download. This is usually located in the top navigation menu. For NordVPN, I clicked on the VPN Apps tab and selected the Chrome icon. Tapping the Add to Chrome button will direct you to the Chrome Web Store.
If you can help it, always go through your VPN’s official website to download its browser extension. By doing so, you avoid downloading potentially corrupted files from third-party websites posing as the real thing.

- Click the Add to Chrome button in the Chrome Web Store to install the VPN extension.

- A pop-up window may alert you to permissions your VPN extension needs when running. Click Add extension if you agree.

Once your extension is added, a confirmation message will appear in the top-right corner of your Chrome browser where all your extensions live. Notice how the NordVPN icon is grey. This is a signal that the VPN isn’t on. Once I login and connect to a server, this should turn blue.

- Open your VPN extension icon and click Log In with Nord Account. If you haven’t already signed up for an account, click Sign Up instead to get a subscription.
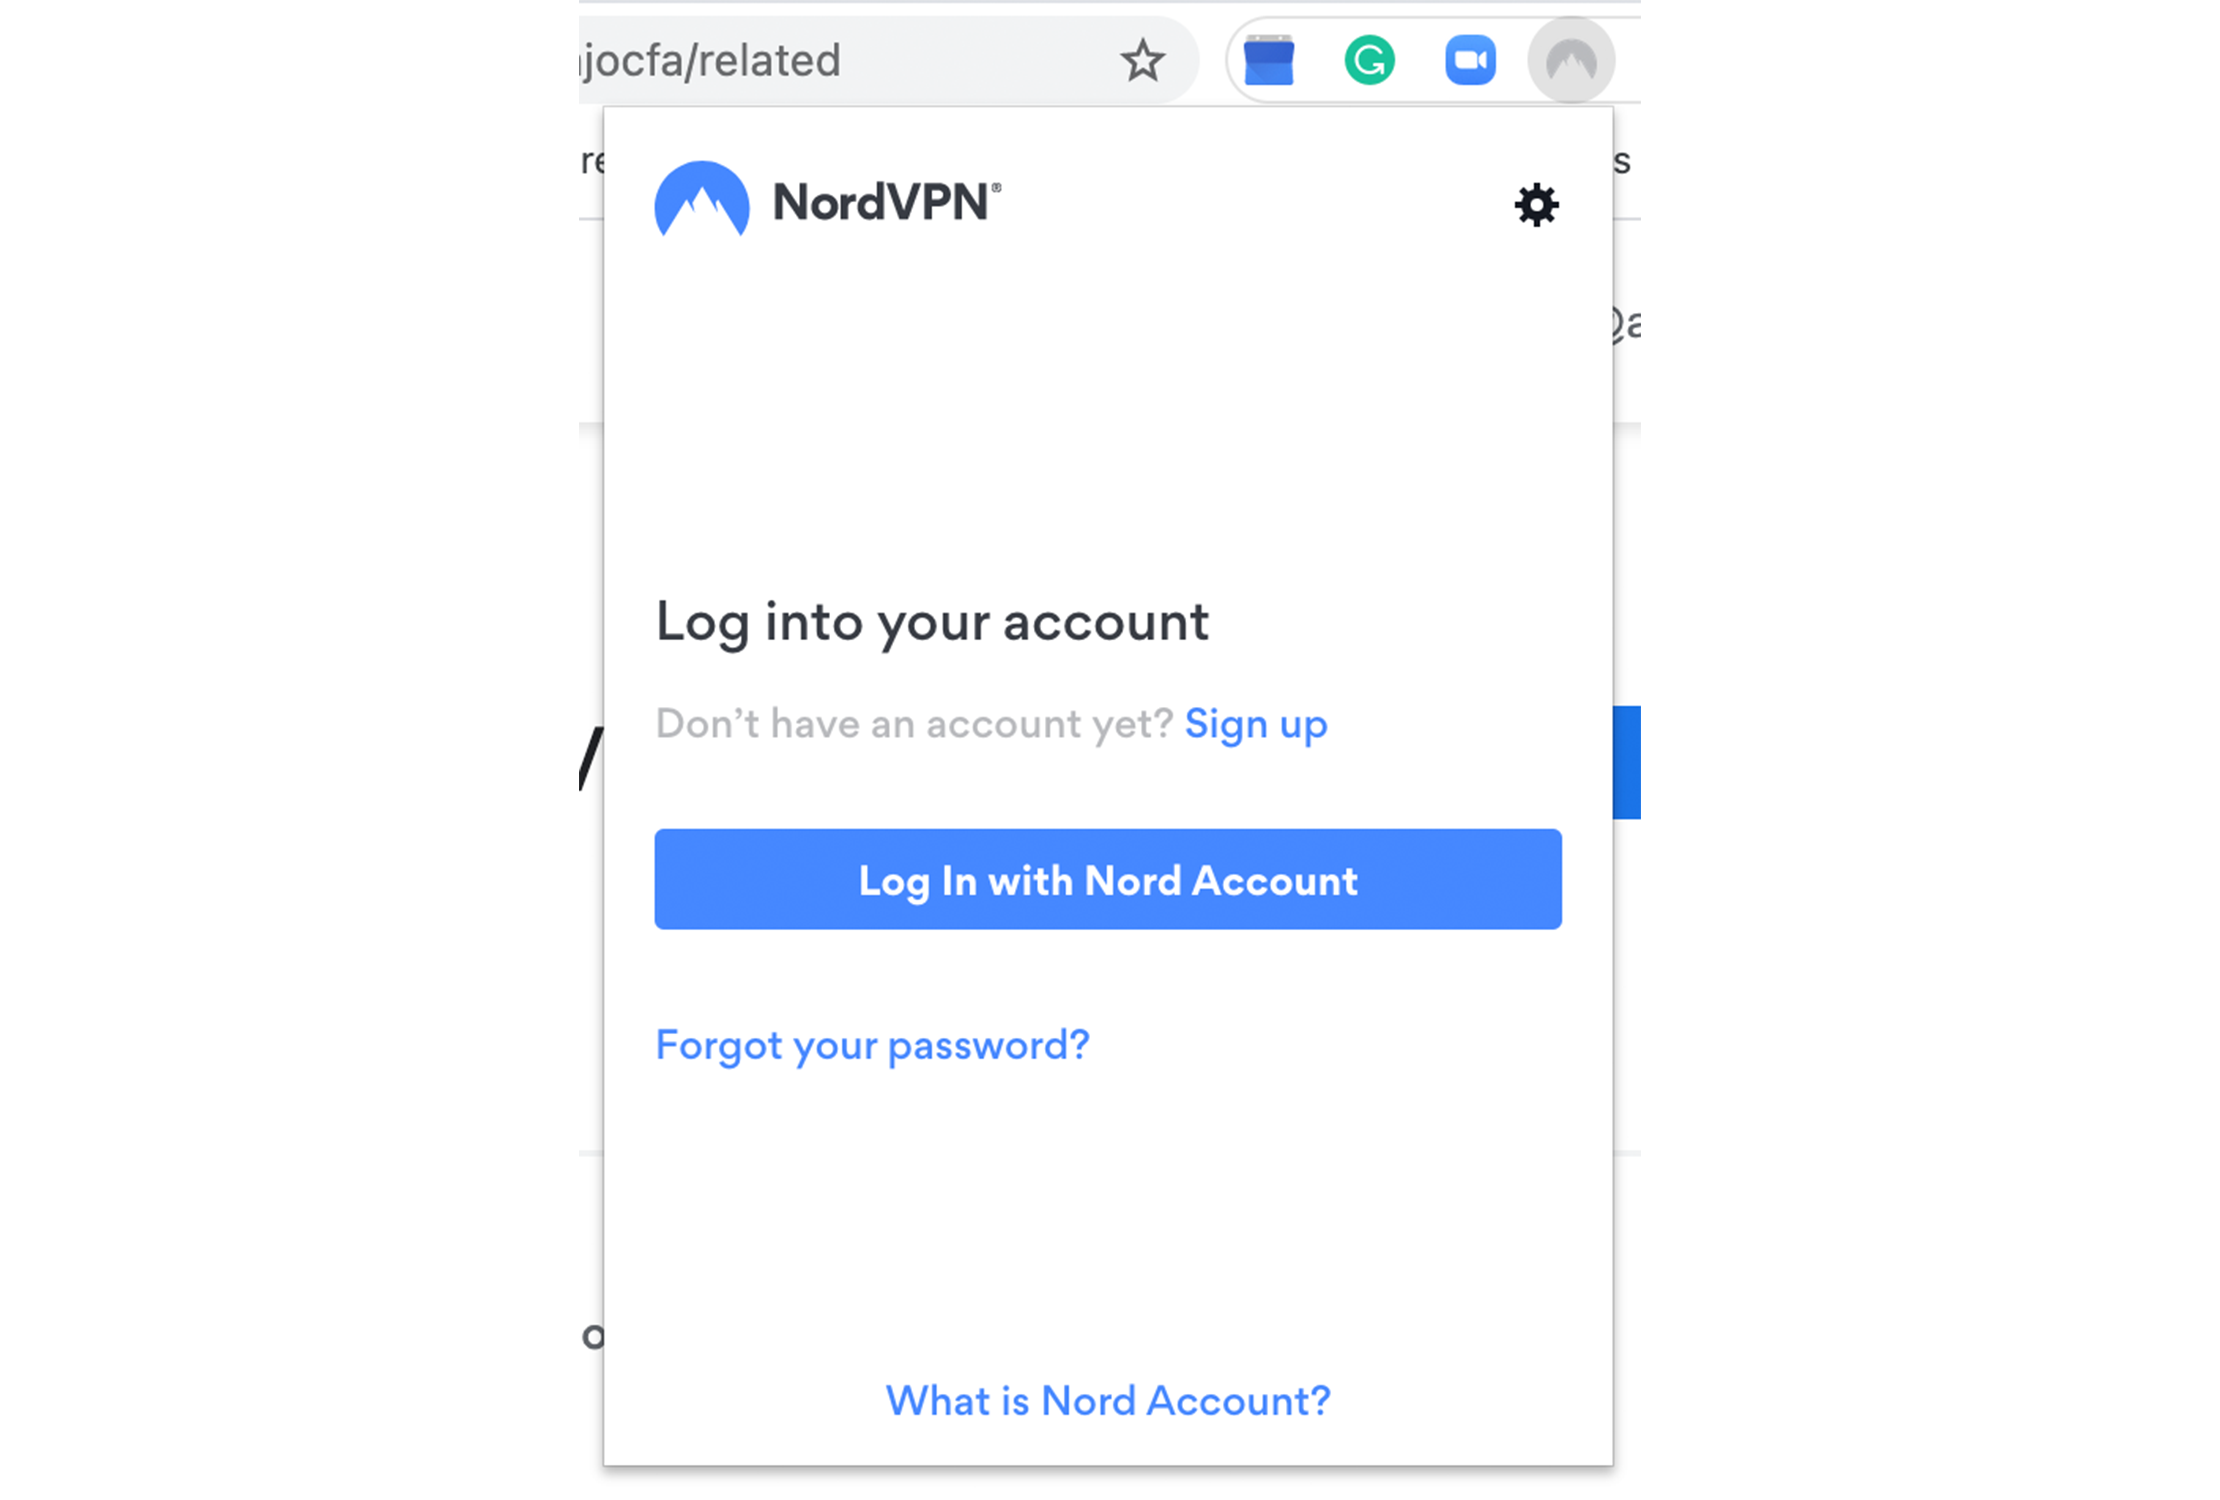
Note here that this step varies from provider to provider. As we mentioned earlier, some VPN providers like NordVPN require you to run a full device app in tandem with a Chrome extension. Other free VPNs may skip this login step altogether and let you connect to a server right away.
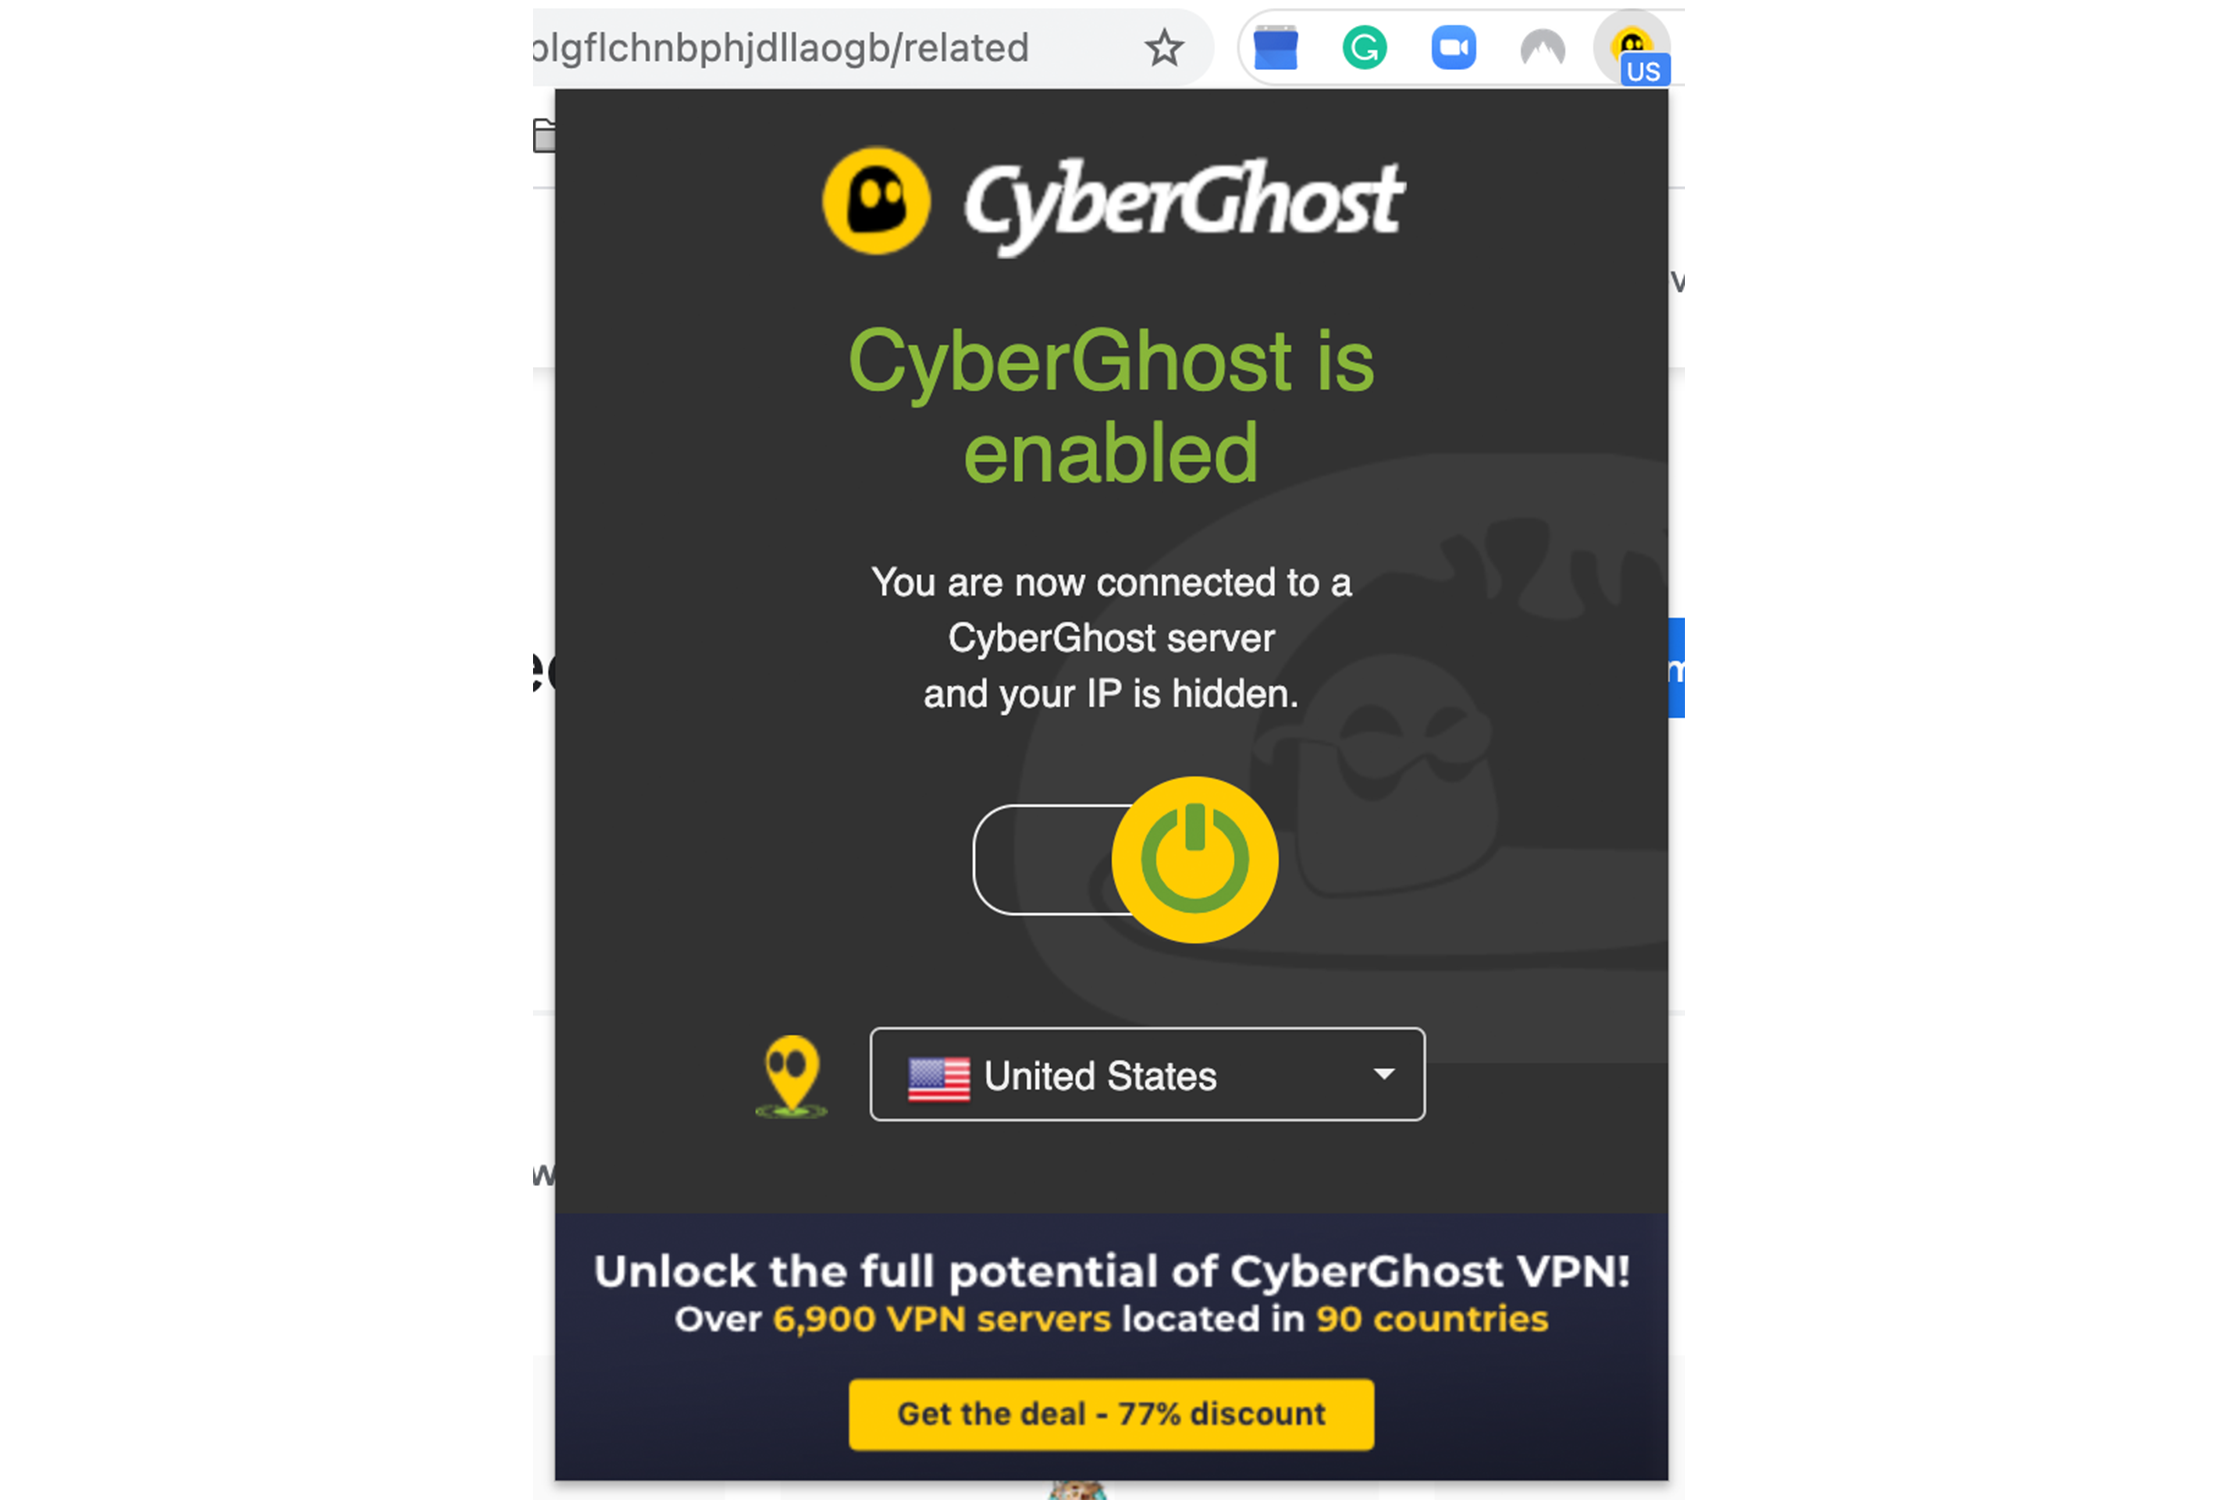
We tested the CyberGhost Free Chrome extension and the ExpressVPN Chrome extension as well to show you what we mean:
If you use a free Chrome extension like CyberGhost VPN, you can connect to a VPN server as soon as it’s installed. Unless you wish to unlock premium features, you don’t need a login.
ExpressVPN is similar to NordVPN in that you’ll need a verified account and have its device app installed and running for your VPN Chrome extension to work. If you don’t have either, your ExpressVPN extension will be sure to notify you.
<img class=”lazyload wp-image-52226″ src=”data:;base64,” alt=”ExpressVPN Chrome extension” width=”2220″ height=”1500″ data-src=”https://www.alwaysvpn.com/wp-content/uploads/2021/07/ExpressVPN_chrome_extension-1.png” /><img class=”lazyload wp-image-52225″ src=”data:;base64,” alt=”ExpressVPN app download” width=”2220″ height=”1500″ data-src=”https://www.alwaysvpn.com/wp-content/uploads/2021/07/ExpressVPN_chrome_extension_login-1.png” />
- Circling back to NordVPN. Once you’ve entered your login information, you’ll likely be notified of your success.
<img class=”lazyload wp-image-52221″ src=”data:;base64,” alt=”successful VPN login” width=”2220″ height=”1500″ data-src=”https://www.alwaysvpn.com/wp-content/uploads/2021/07/Chrome_Feature.18_NordVPN__extension_login_successful-1.png” />
- Before connecting to a server, take a look at your VPN’s settings to make sure it’s configured how you want. You can find this by clicking on the gear icon (like NordVPN has below) or a burger menu (three stacked lines).
At the very least, you want to ensure that WebRTC leak protection is turned on to maximize your safety online.
<img class=”lazyload wp-image-52218″ src=”data:;base64,” alt=”NordVPN extension settings” width=”2220″ height=”1500″ data-src=”https://www.alwaysvpn.com/wp-content/uploads/2021/07/22_NordVPN_extension_settings-1.png” />
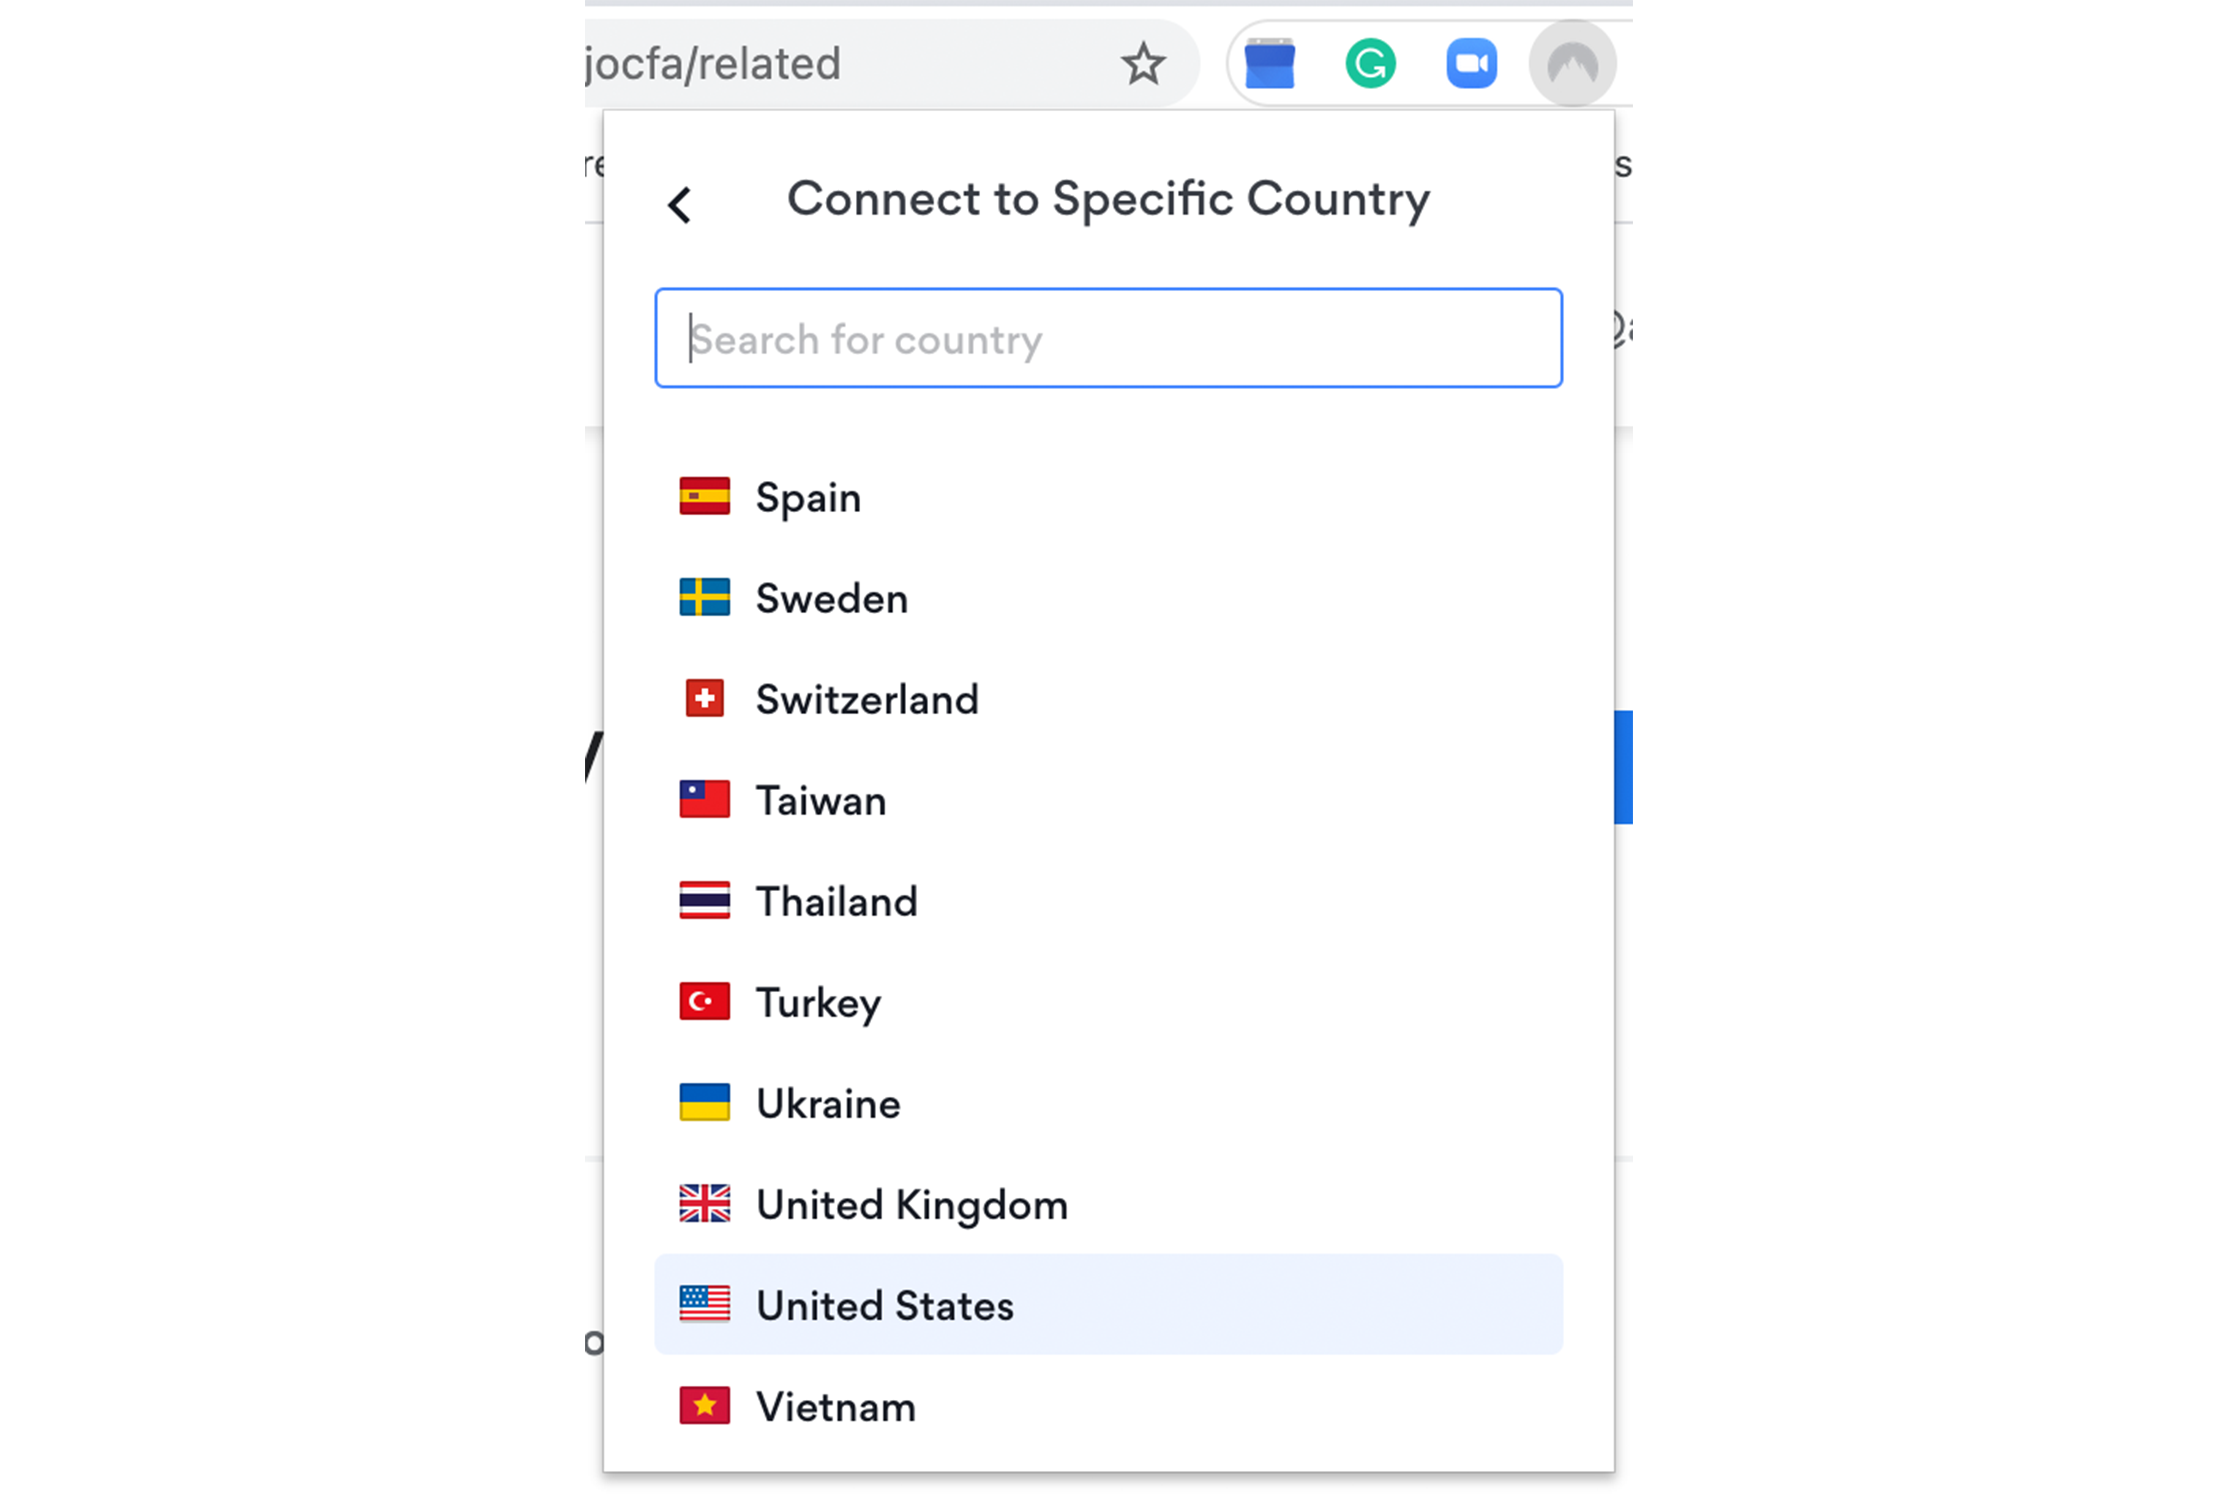
- It’s time to connect to a server. Some VPN providers give users the option to Search for a specific country or automatically connect to the closest server nearby.
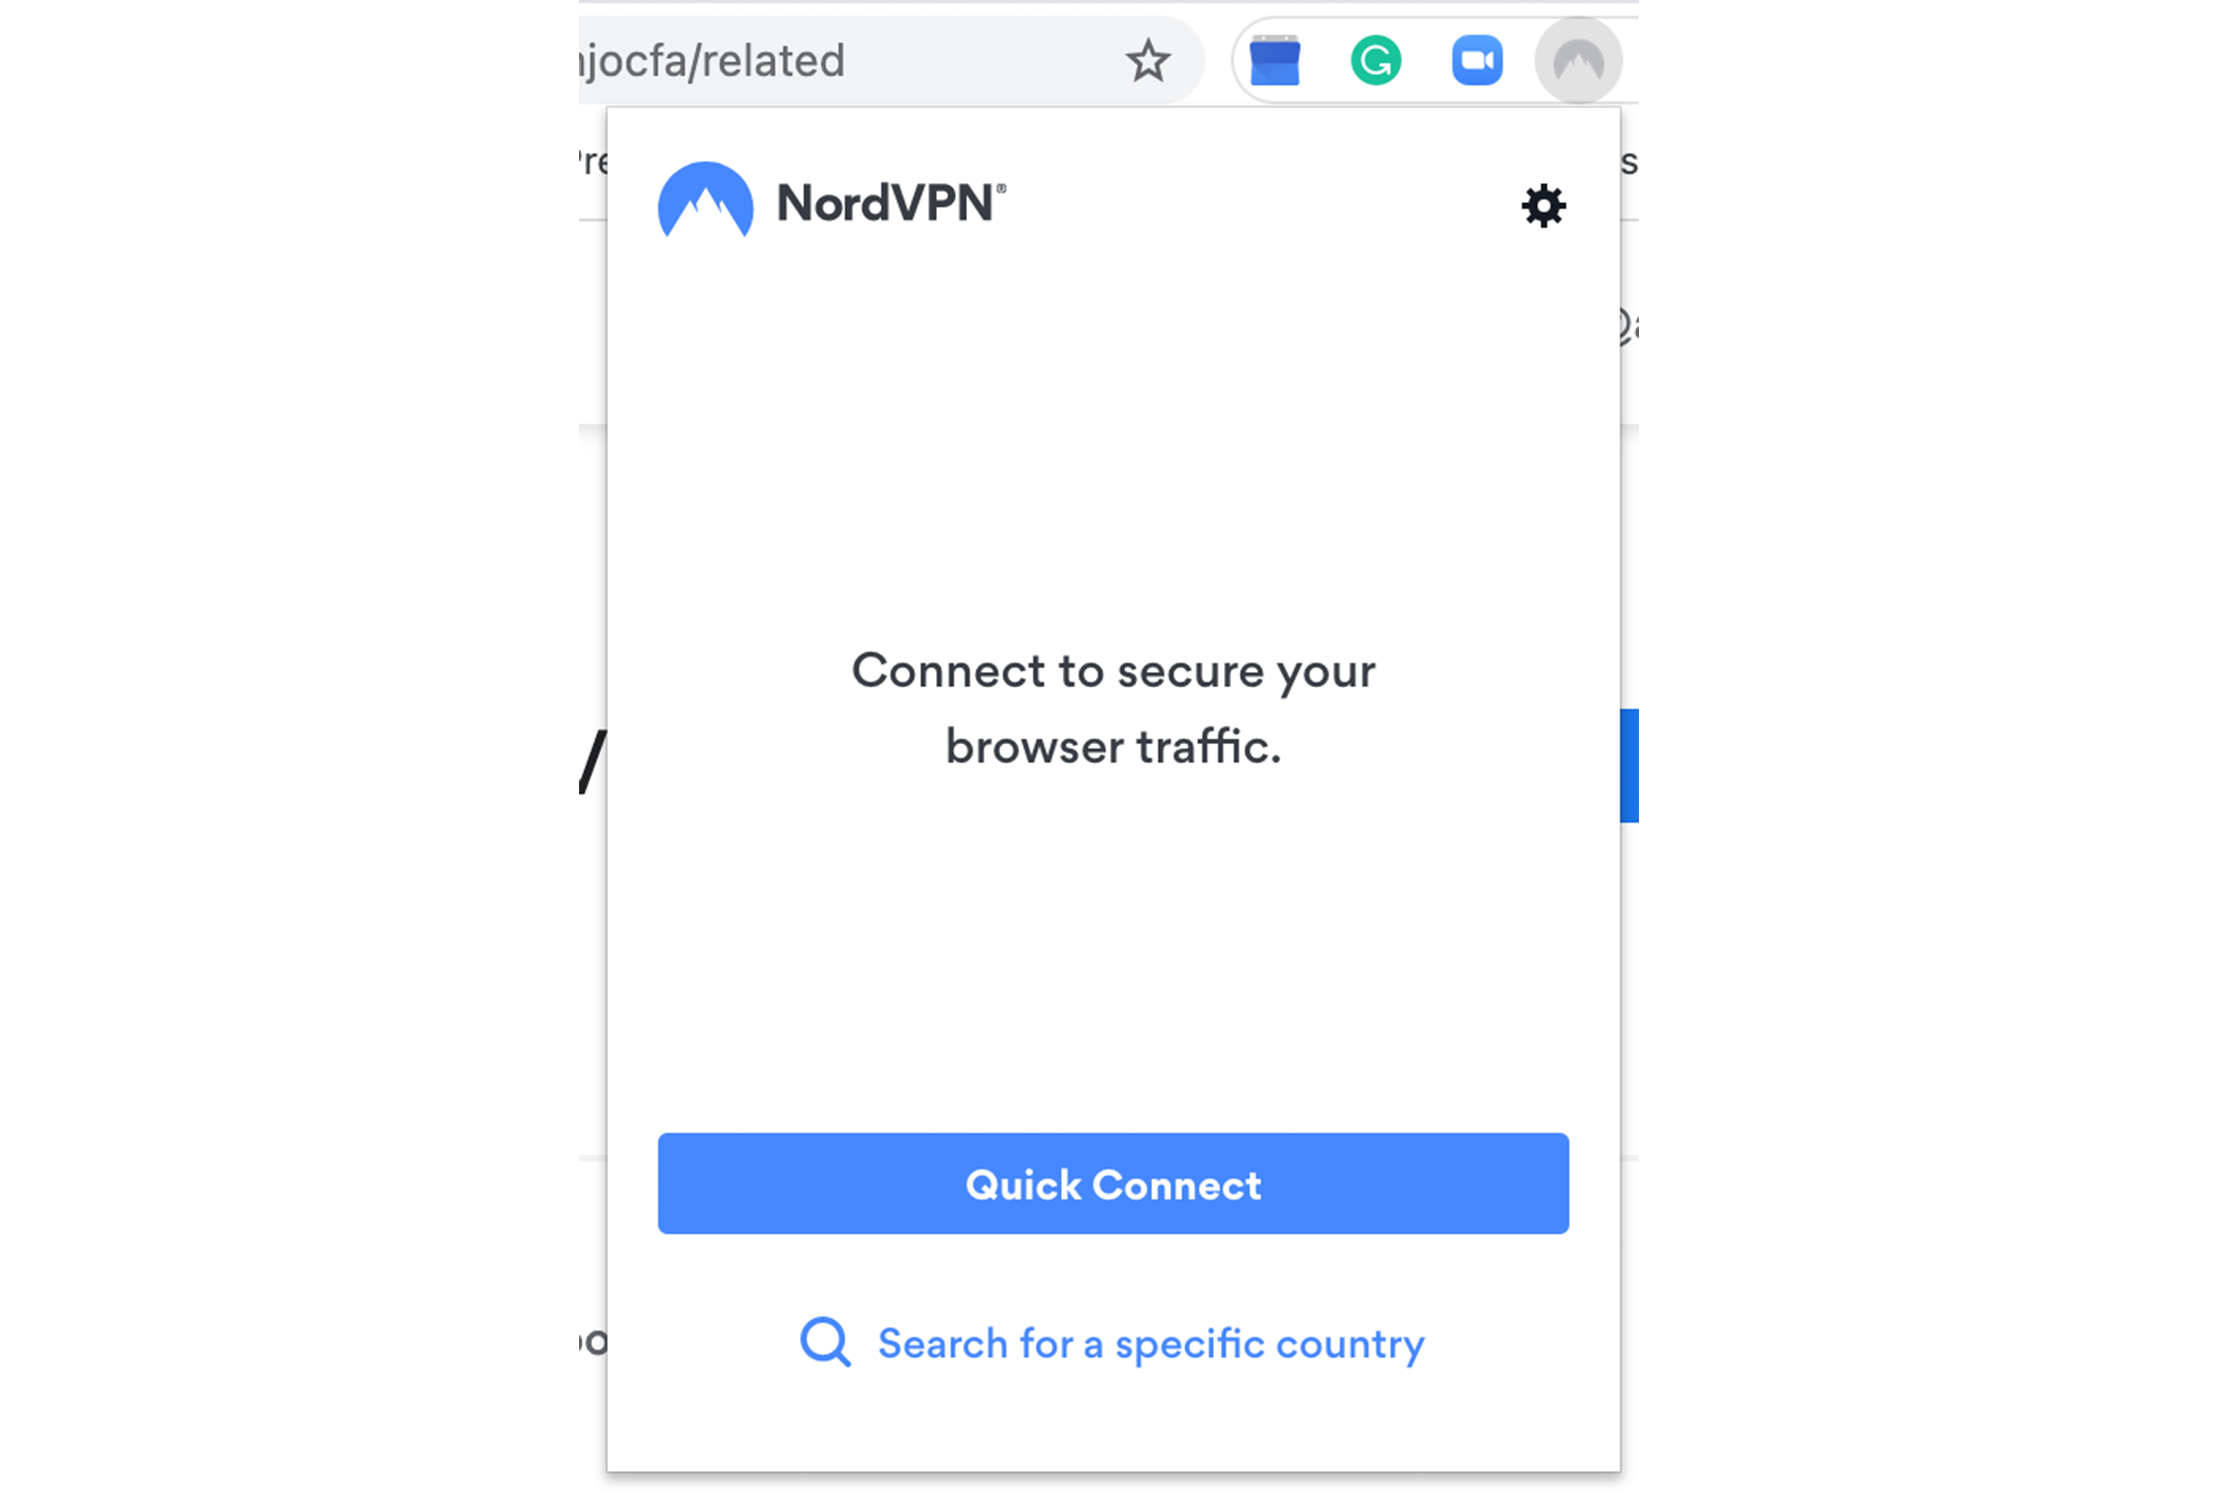
If you prefer to pick your own server, scroll through the list of server locations and simply click on the country of your choice.
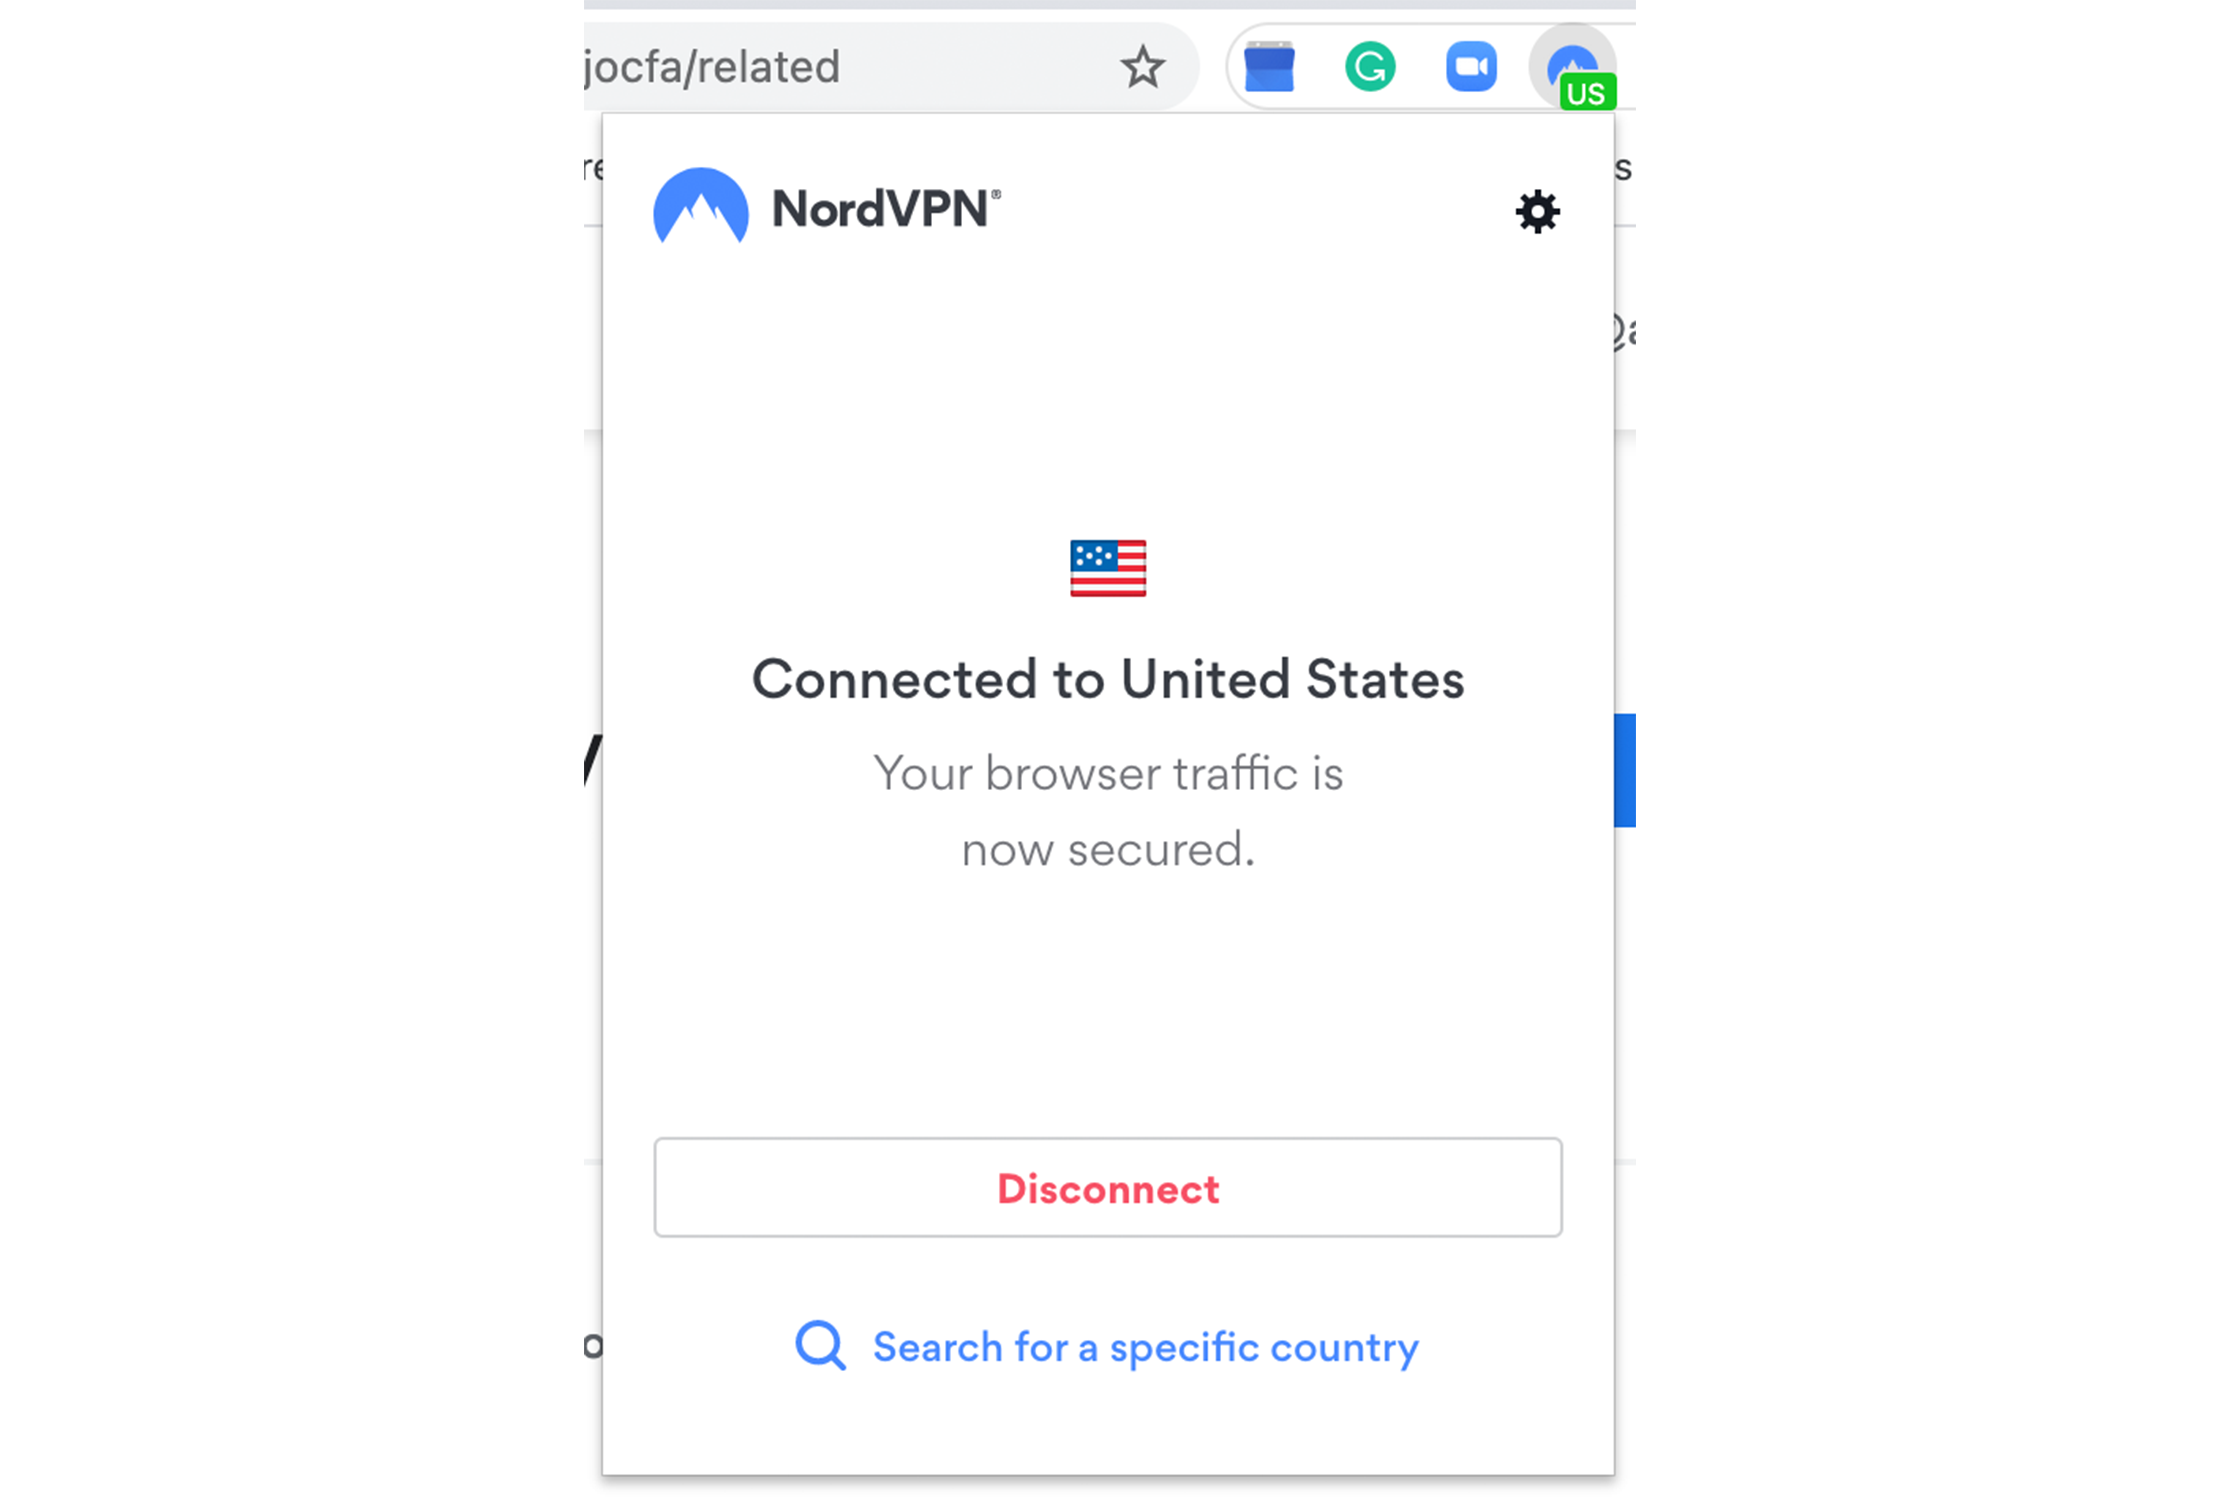
- Voila! Your browser traffic is now secured.
You’ll notice a few things change on your VPN Chrome extension that let you know it’s connected:
- The main dropdown for your extension should read “Connected” in some shape or form. For NordVPN, it clearly states that I am “Connected to United States. Your browser traffic is now secured.”
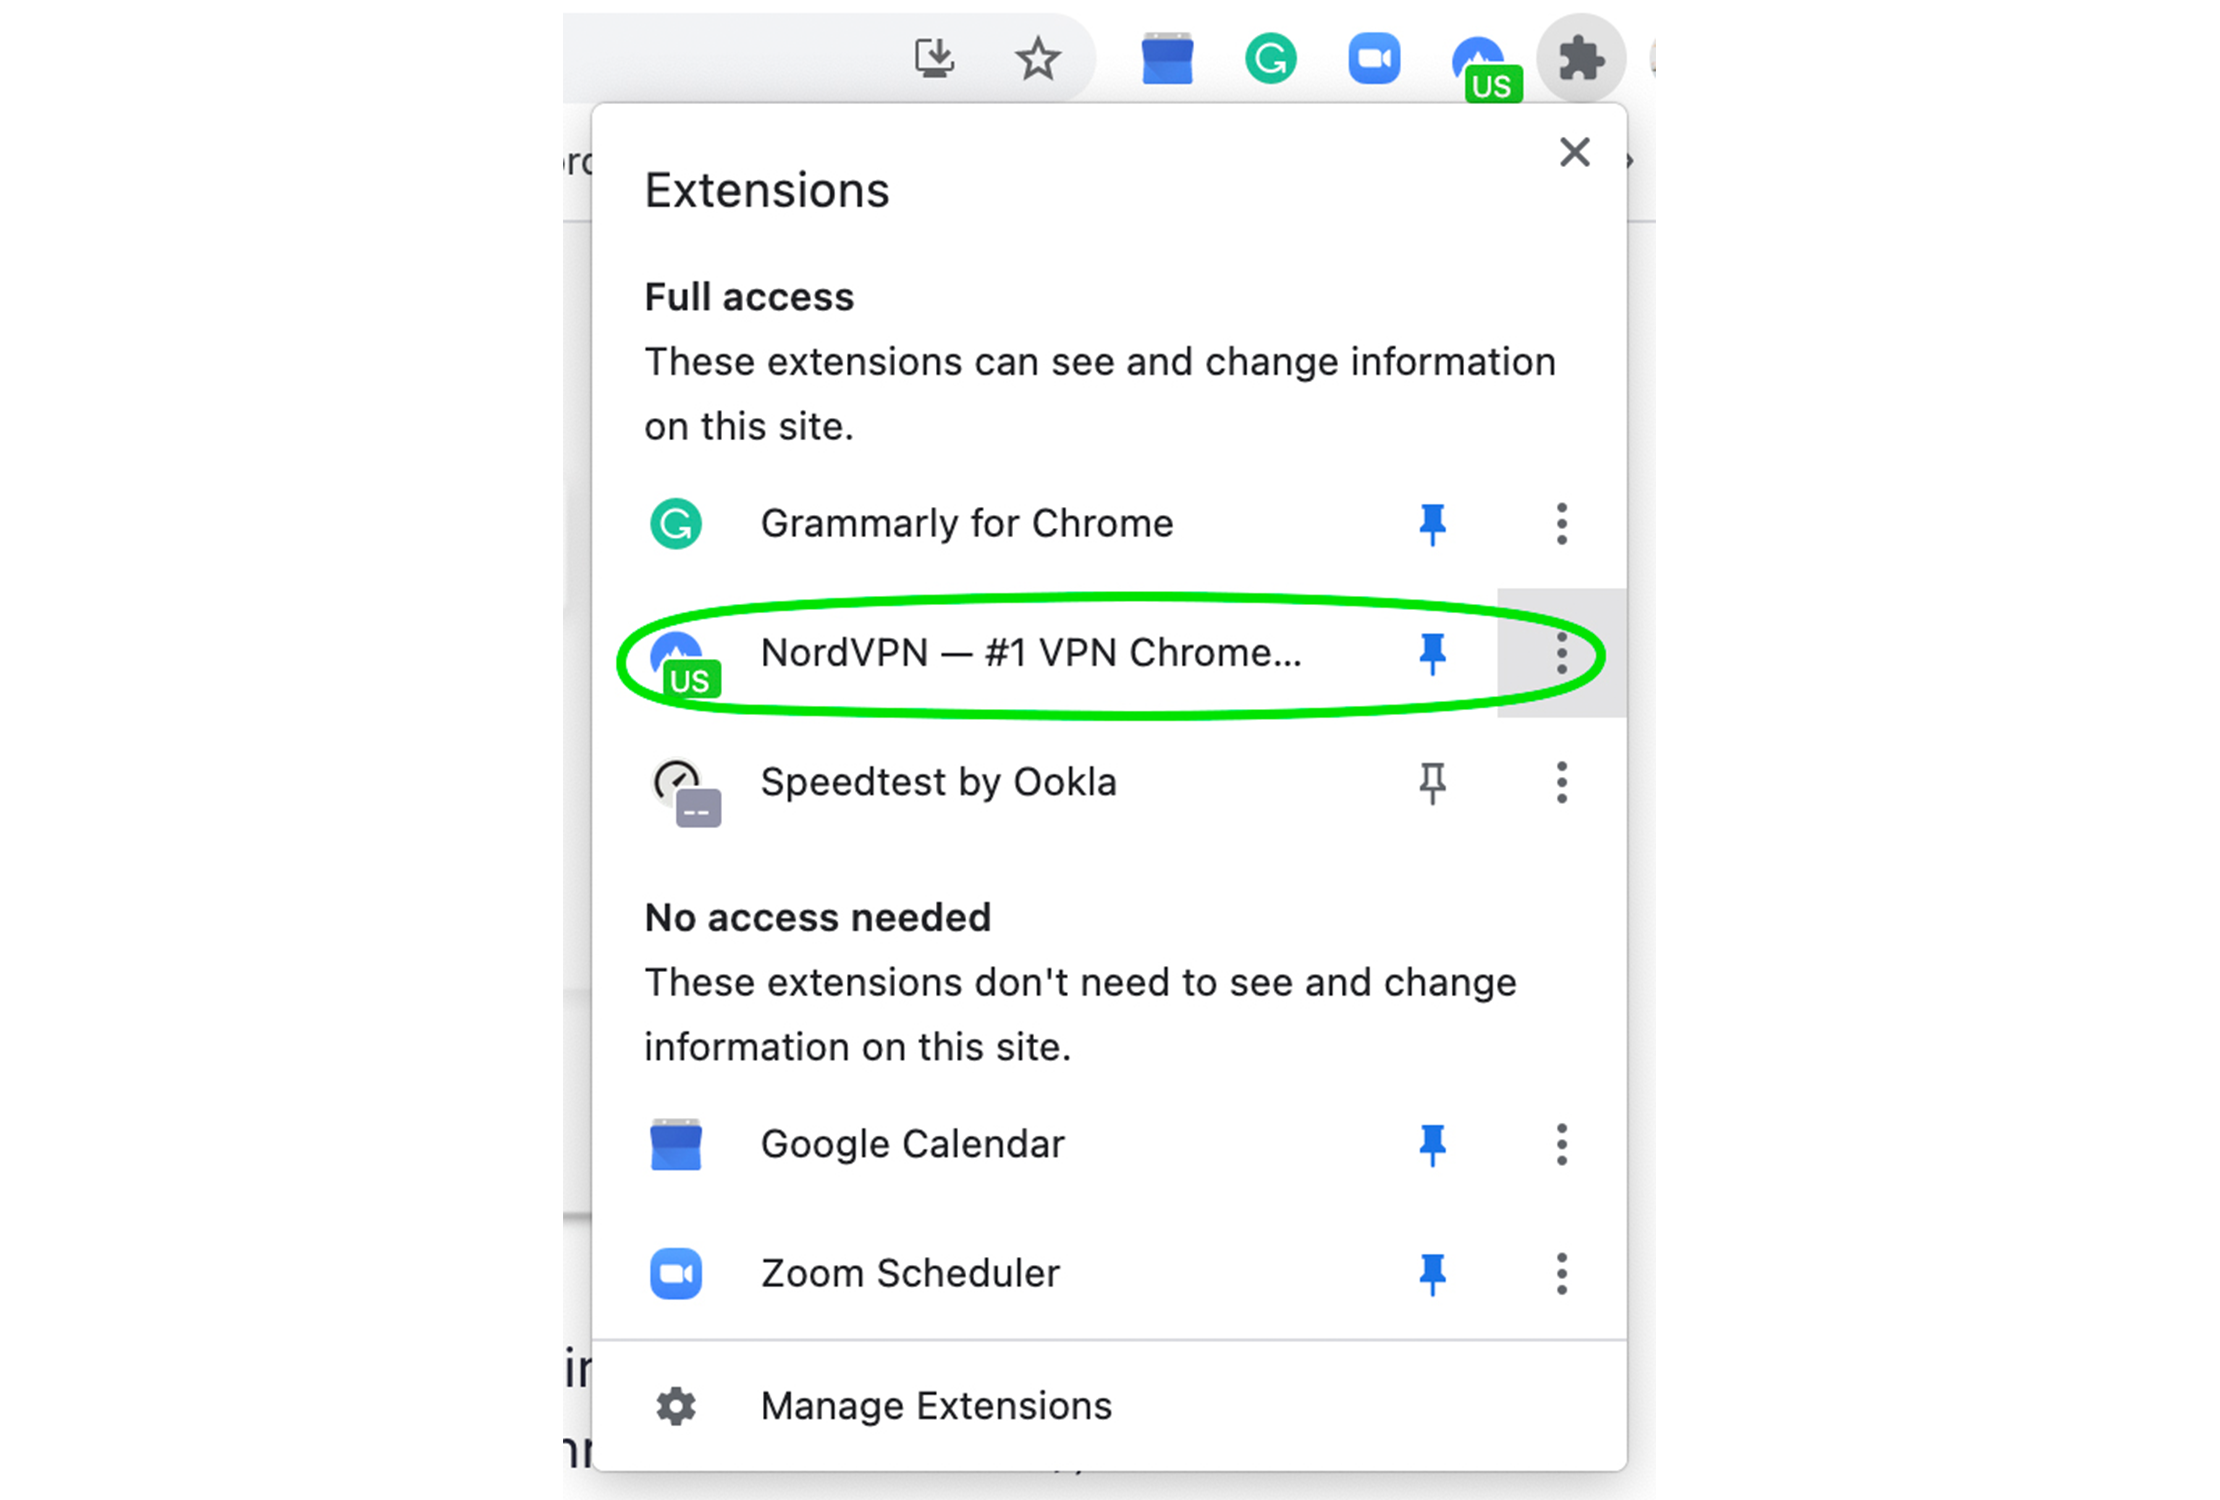
- The VPN icon in the extension bar changed from grey to blue. It also displays a green flag with the abbreviation of my server’s country location. Turning my VPN off will revert it back to grey.
Finding a reliable VPN for Chrome can be frustrating. Many VPN providers claim to collect zero logs or deliver fast connection speeds, but when put to task many VPNs end up being unsafe. Our experts reviewed top providers to find the best Chrome VPN in 2021.
Each VPN listed below passes our IP/WebRTC leak tests, offers a native Chrome extension, and unblocks geo-restricted content without significantly slowing down speeds. You’d be safe online with any of these top providers.
| VPN | Lowest Price | # of Devices | Logging Policy |
|---|---|---|---|
| NordVPN | $4.13/mo. | 6 | Strong “no-logs” policy |
| CyberGhost | $2.25/mo. | 7 | Strong “no-logs” policy |
| Surfshark | $2.21/mo. | Unlimited | Strong “no-logs” policy |
| Private Internet Access | $2.69/mo. | 10 | Strong “no-logs” policy |
| ExpressVPN | $8.32/mo. | 5 | Strong “no-logs” policy |
Chrome VPN extensions are meant to be set-and-forget tools you can leave on in the background. But there are times when it’s necessary to pause or remove your VPN service altogether. Here’s how to go about both.
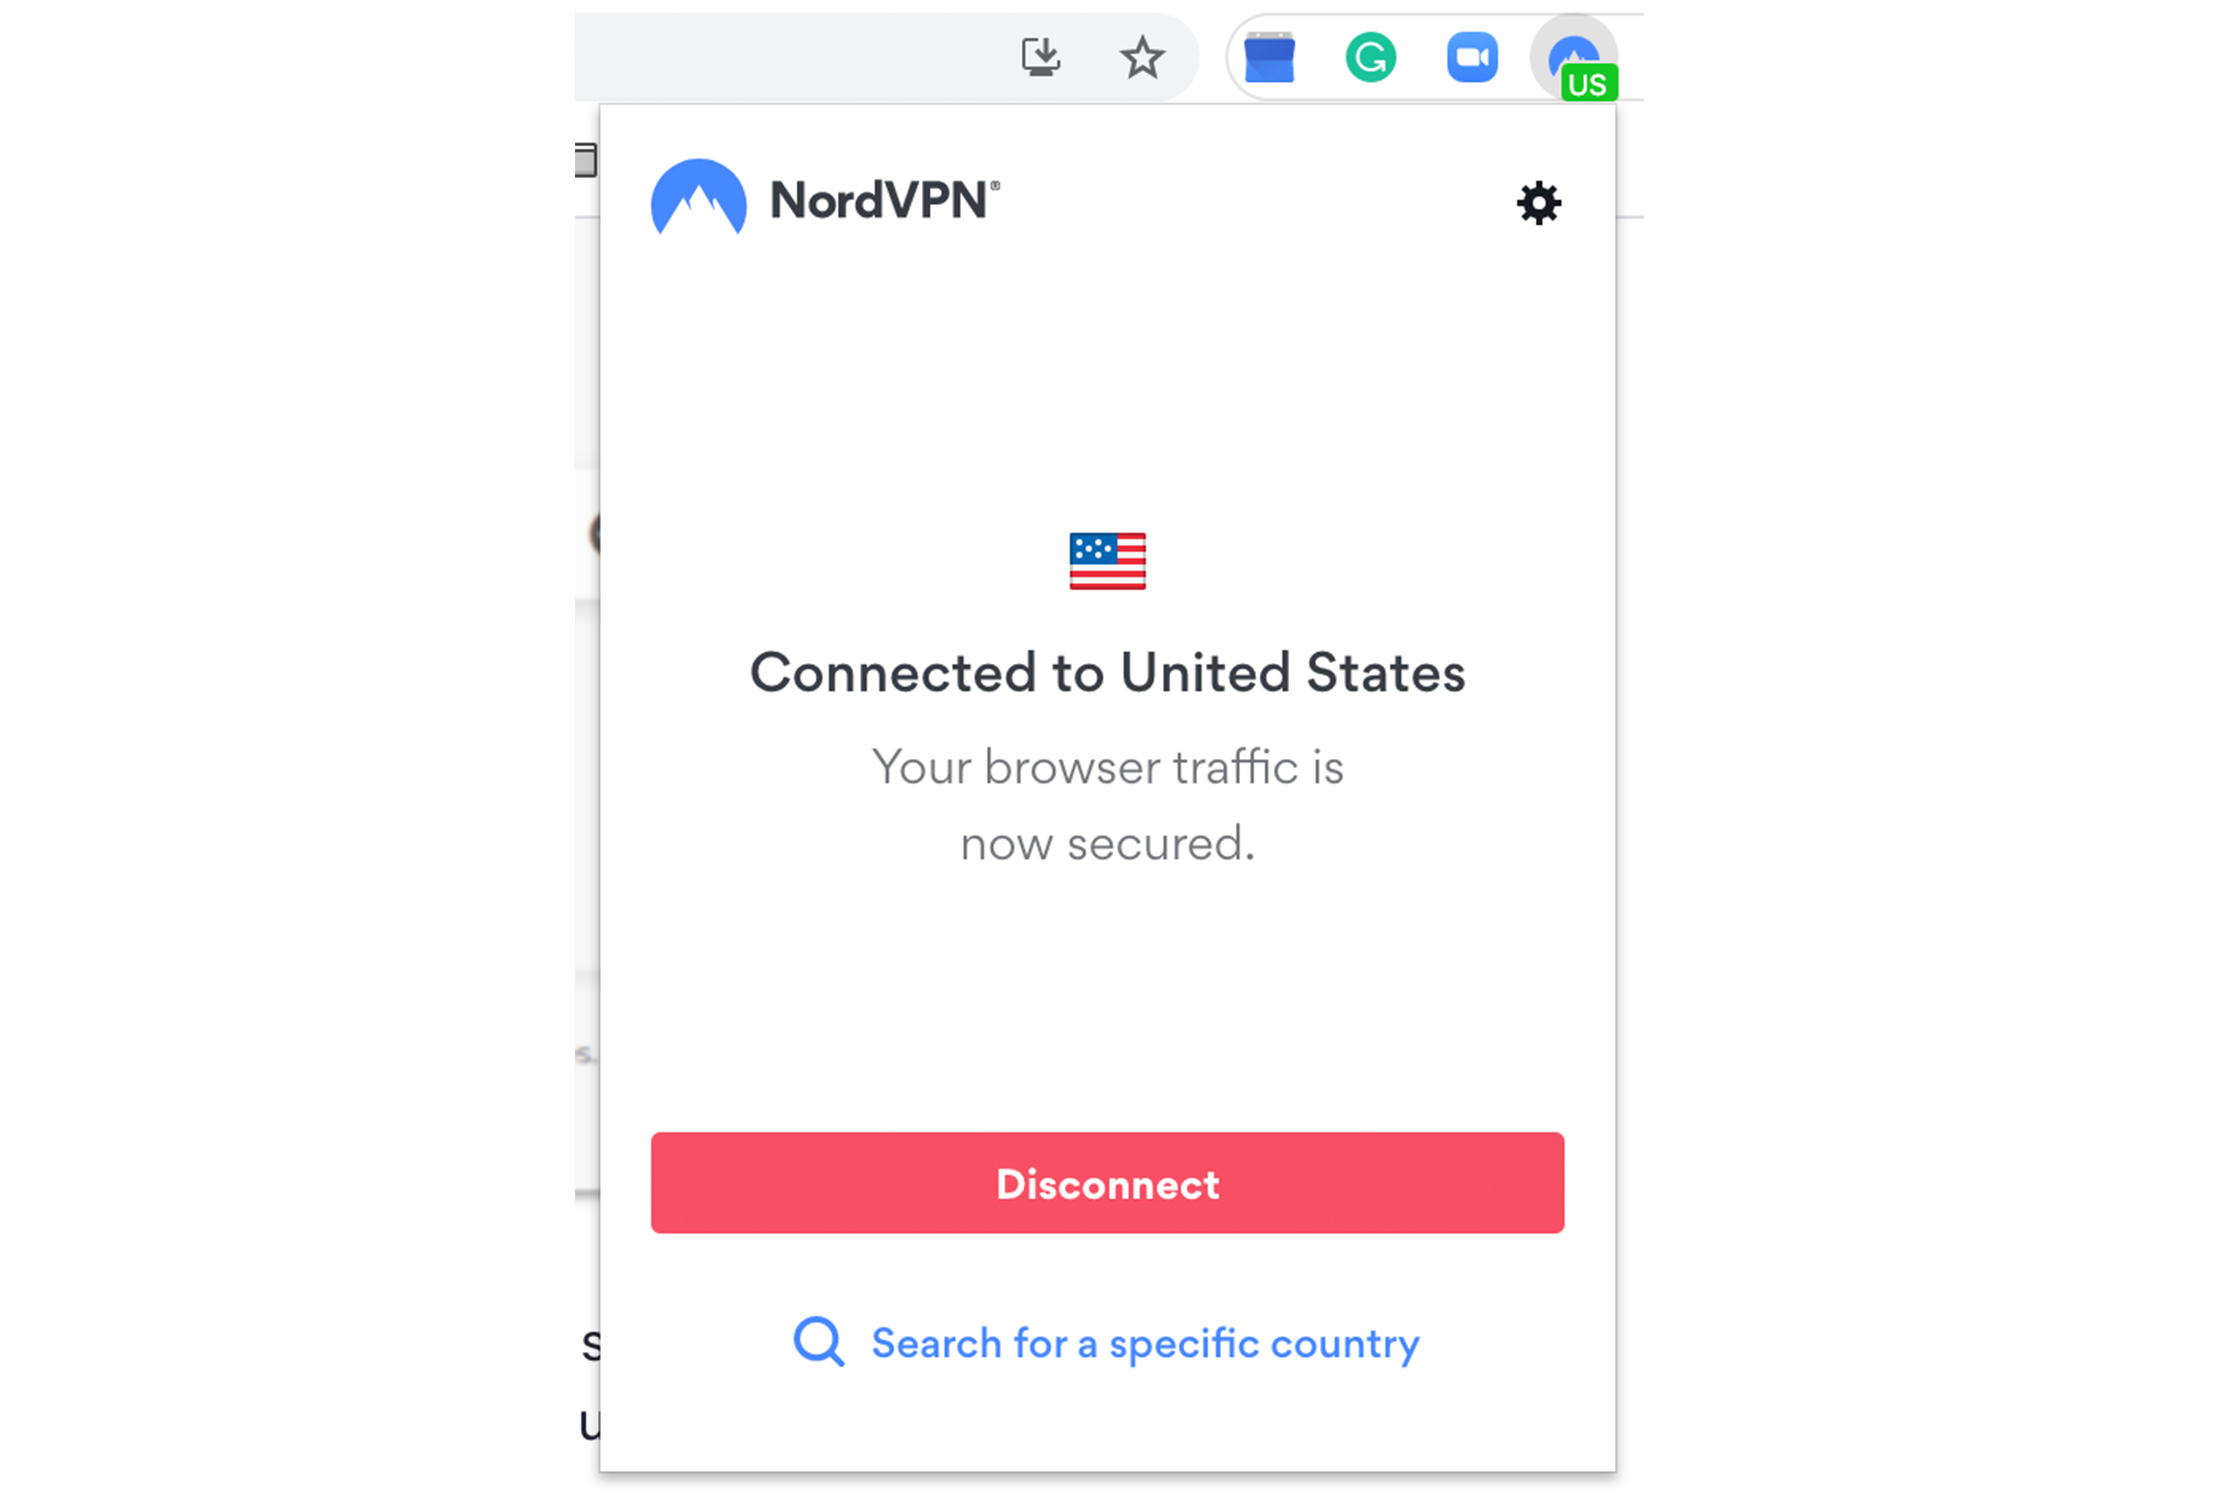
Turning off your Chrome VPN extensionIf you ever want to turn off your VPN, simply click Disconnect from the main dropdown. However, we recommend keeping it on at all times to protect your personal data online.
If you need to delete your VPN Chrome extension, click on the puzzle piece icon in your extension bar and find your VPN’s menu (three stacked dots).
From the menu, click Remove from Chrome and it will be deleted from your browser.

- What are WebRTC leaks?
- Can I get a VPN browser extension for free?
- Are VPN browser extensions safe?
- Are there VPN browser extensions for Safari, Opera, and Firefox as well?
WebRTC is browser technology that enables audio and video to work in website pages. However, in order to communicate this information, your browser needs your IP address as a point of delivery. A WebRTC leak is when your IP address is revealed during this exchange.
The best VPNs usually come with WebRTC leak blocking to prevent this, but we recommend running your own leak tests periodically to be sure it’s working for you. You can use this leak test tool to check yours now. If your IP address pops up on the results, it means you have a WebRTC leak.
2. Can I get a VPN browser extension for free?
Yes. There are a lot of free VPN browser extensions available, but we don’t really recommend it. Free VPNs often log your personal data, track your web traffic, and sell your information with third parties. The most effective VPNs for Chrome usually come with a price tag, but you get what you pay for in this case.
Check out these best VPNs for Chrome to see what fits your needs.
3. Are VPN browser extensions safe?
Not all VPN browser extensions are safe. Since it’s geared toward only protecting your in-browser connections, they don’t provide the same level of privacy as a full VPN app.
However, some providers like NordVPN require users to run a VPN app and browser extension in tandem. This adds the additional security needed to privatize all internet activity on your device.
4. Are there VPN browser extensions for Safari, Opera, and Firefox as well?
Yes. Many providers offer different versions of their VPN browser extensions. The majority of these extensions can be found in the Chrome Web Store or Firefox Add-Ons Store, but there are also extensions for Opera and Safari.
